Artist Tips: My Favorite Tools to Create Texture
- Amber Kerrigan
- Jun 22, 2020
- 7 min read
Updated: Sep 19, 2020

As you may have seen with many of my pieces on this site and on Instagram I love adding texture to my paintings. Texture, especially in abstract art, is very important in conveying themes, adding interest, and creating depth in your painting. So I've compiled a short list of some of my favorite tools and techniques I use to achieve texture in my paintings.
Disclaimer:
Any products mentioned or linked in this post are NOT sponsored and I don't get anything if you purchase from these links. I genuinely like and use these products and want to share them with you.
Palette Knives:
Classic Palette Knife
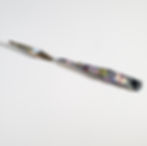
As you can see from the many built up layers of paint I use this knife a lot. It's a Liquitex Professional Painting Knife Small in #5 and I mainly use it to lay down large areas of color when I begin a painting. I feel that palette knives help spread the color around better than brushes if you're just trying to get some initial color down. I also use it to build up color and make areas that are thicker than others. It's also great for mixing paint and putting gel medium on canvas since it's easier to clean than a brush. Overall, this is just a solid artist tool that I come back to again and again. They also have knives in the same shape as this but a larger size. Since I mainly work with medium to small canvases this size works fine for me. But if you do larger paintings I might get one in a larger size.
Worison Palette knives:

I got these as a gift for Christmas and have been loving them ever since! They came in a set of 9 but I mainly use numbers 1, 2 and 3 (as you can probably tell by the amount of paint on them). These palette knives have a lot of unique shapes to them compared with the traditional palette knife and create really interesting textures. I like to use then for scraped or scratched texture, but they can be used for a lot more. Below I've shown an example of some of the textures that can be created with them.


Natural & Synthetic Sponges:
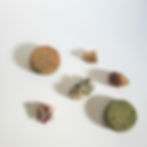
I use a variety of sponges in my work to add texture but the ones I use the most are the sea wool sponge (middle and bottom left) and the synthetic round sponge (top left and bottom right). These are a relatively cheap and easy way to start adding texture to your work. The sea wool sponge is great for stippling and blending two colors together. I especially like to use it in my galaxy paintings to combine the colors for the sky. The synthetic round sponge gives a more subtle texture and I've also used it as a stamp for print designs. Also when used with acrylic inks as opposed to heavy body acrylics it gives a bubbly, watercolor effect that's really interesting.


Some downsides to sponges are that with each use they disintegrate slightly, especially if you're like me and are a little rough on them when cleaning. So I wouldn't get too attached to any one sponge since you won't have it forever. They can also get mold or mildew if not taken care of properly, so always remember to wash and fully dry your sponge between uses to keep mold from growing.
Large, bristly brushes:
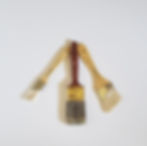
Another great way to add texture is with a paintbrush, but more specifically using a wiry, stiff bristled brush, as opposed to a smooth one works wonders. So if you have an old brush that you may have used to paint your house or one that looks like it's seen better days I wouldn't throw it away just yet, because it could be perfect for adding some subtle texture. I use this 2'' coarse, slightly frayed brush that I've had since forever (center brush) to create really nice, subtle background texture.
You can vary the amount of texture by how much water you use with the brush or if you use more water based paints like acrylic inks or watercolors. I prefer to use it dry or almost dry. The one potential downfall is that these brushes tend to shed their bristles easier than smooth brushes so it's something to watch out for. Or that could just add another layer of texture if you keep the fallen bristles, it's totally up to you!


The first picture uses both acrylic inks and heavy body acrylics which gives it a slight watercolor effect. In the second it is used for the background with sponges used on top. In the third you can see the texture it gives more clearly.
This link is for an assortment of brush sizes. But you can also get brushes like these for relatively cheap at places like Lowes or Home Depot.
Gel Painting mediums:
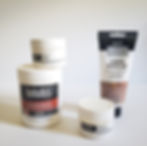
I love using gel mediums for my paintings! Though some may find them intimidating at first they're actually really easy to use. I use Liquitex Gloss Super Heavy Gel the most for my paintings. Super Heavy Gel starts out as a white, creamy consistency but dries mostly clear which makes it great for creating a textured base to put whatever color you want on top. You can also mix the paint in with the gel while you apply it to the canvas.
In the picture below I use multiple layers of this medium to get the effect shown. It took about 5-10 thick layers for this which resulted in the medium protruding about 1/4 inch out from the canvas to give it that 3D effect. But you can also use less for a more subtle textured look. I use a palette knife or stiff brush to apply thick layers to the canvas and try to create peaks so that it really looks like it's coming out of the canvas.


Some other mediums I like to use are Coarse Texture Gel (also from Liquitex) which was also used in the painting above. It creates a great tactile, rough texture like that of a gravel road. It dries white instead of clear but can also be mixed directly with paint. It doesn't spread as nice as gel medium or paint so you'd need a good amount to cover a large area.
Matte and Gloss Gel (either from Golden or Liquitex) work very similarly to Super Heavy Gel, though they are softer and more malleable than heavy gel and don't hold as stiff of peaks. They can still be built up in layers to give a similar result. As the name suggests Matte Medium dries with no shine as opposed to Super Heavy and Gloss which have a slight sheen. Liquitex has Super Heavy Gel in a matte version as well if you want that thicker consistency without the shine.
Some downfalls of these products are that if you do a thick layer it can take almost 24 hours to fully dry, and it would need to be dry to be able to put a new layer or different paint color on top. So if you're the type who likes to work quickly this could feel tedious to you. Usually when I'm working with this medium I have other paintings to work on so I have something to do while that one dries. Secondly, when using Super Heavy Gel, if you do thick layers it sometimes dries with a slightly yellow tinge and not fully clear. So if you wanted it on top of your painting and needed it to be perfectly clear, you'd have to do a lot of thin layers to achieve it, but if you're just going to cover it with paint then it doesn't matter as much.
Painting mediums in general can also be a bit expensive, so if you're on a budget or new to making art you might want to try out other ways of creating texture before investing in these products and potentially not liking them. I would recommend investing in just one of these that sounds the most interesting to you instead of getting all of them at once.
Paint Contours and Wedges:
This one is a newer purchase of mine as I had seen a few other artist using these and wanted to try them out. I purchased the Princeton Catalyst Wedge in Shape 6, but they offer a bunch of other ones with different ridges to create different textures. Mine being more smooth is a great way to spread paint thinly over a large area. It also gives a very subtle texture that's great for a background so you can either put more texture on top or not. I also like to use it to scrape away the top layer of paint and reveal the colors underneath of a painting. So if you already have color down and put a thick layer of a new color on top you can then take the wedge across to spread the paint while also scraping some of it away to reveal the color underneath. Below you can see an example of what I'm talking about.


This product is great at giving the illusion of texture while keeping the actual canvas relatively smooth. So it you like the look of texture without the rough or heavy feel that might come from gel mediums or palette knives then this is a great product for that. The wedge, also being larger than palette knives and certain brushes, makes it great for if you like to work on large canvases.
Making Your Own Tools:
If you can't find the tool to make the type of texture you're looking for, why not use unconventional tools or make some yourself! Benefits of this are you will feel even more connected with your art making because you're creating your tools as well as the finished product. You'll get exactly the texture you want or discover a new texture you didn't know you needed. And your paintings will have an element that can't be copied making them even more unique. These tools can be anything from things in nature like twigs and leaves, to fabric and household objects such as forks and spoons. You could even hand-make a stencil. The possibilities really are endless so it's beneficial to get out and experiment to see what works best for you.
I hope this post will help you find some fun techniques and tools to add texture to your paintings. So tell me, do you like adding texture to your art? Is there anything that wasn't mentioned on here that you like to use for adding texture? If you've tried any of these products how did it go for you?
Would you be interested in a more in-depth blog post about making your own art tools or more specific techniques I use with the tools mentioned. Comment below, I'd love to hear from you. If you want to get updated on when this blog posts as well as sales and events in my shop subscribe to the Amber K. Studios' email newsletter!